
In a cryptocoin world there is a mass of new things, programs and terms that confuse users especially beginners. For new Bitcoin users here is a guide how to start trading, investing and generally be a part of a digital coin era. If you decide to start using Bitcoin, you have to open a Bitcoin wallet. There are a number of Bitcoin wallets, one of the most popular is Electrum. It is a wallet for either beginners and advanced users.
Electrum is perfect for daily use, online transactions and fund transfer among people. At the first glance it looks simple and has an easy interface, but it is one of the safest wallets in use, so it is recommended to all type of users. Electrum focus is low data usage with speed and simplicity.
Please read the following instructions and tips for installing, setting and securing Electrum. This Electrum wallet guide will lead you through the important beginners’ attributes.
| 🔑 Feature | Summary |
|---|---|
| 💻 Platform Compatibility | Electrum is a desktop Bitcoin wallet available for free download on Windows, Mac, and Linux computers. |
| 🪶 Lightweight Client | Electrum is a lightweight Bitcoin client that connects to external servers, eliminating the need to download the entire Bitcoin blockchain. |
| 🔒 Security | The wallet offers robust security features, including encryption. Access to the wallet requires a password if someone gains access to your desktop. |
| 🔌 Hardware Wallet Integration | Electrum supports integration with major hardware wallets like KeepKey, TREZOR Model T, and Ledger Nano S. |
| 💰 Transaction Customization | Users can set the Bitcoin transaction fee and utilize features like rbf (Replace-By-Fee) and childpaysforparent. |
| 💵 Pricing | Electrum is available for free download. |
| 🪙 Supported Coins | Electrum is a Bitcoin-only wallet and does not support other cryptocurrencies. |
What you'll learn 👉
How to use Electrum – Installation
The very first thing you have to do is to install.Operating system and installation instructions and tips are available from the download page.
Installation on Windows
There are 3 Electrum versions for Windows. The most suitable is one titled as‘Windows installer’.
Installation on Mac
The first thing to do is to select download labeled ‘Executable for OS X’. A bug stops the latest version of Electrum from starting an OS X and the missing features on the previous version linked on the front page will not be used here.
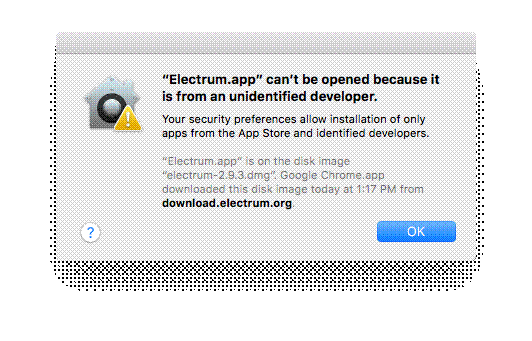
Double click on the downloaded folder opens the window. Select the Electrum.app and drag into Applications folder, you can see this under favorites on the left side of the window. Next step is opening the Applications folder and selecting icon Electrum. It is possible that an error message pops out saying that Electrum cannot be opened cause of an unidentified developer. If this happens, find Elecrtum in your application folder and control click on it, select open on the menu.
Installation on Ubuntu Linux
The Linux installation is on the Software Center, This is maybe outdated version, but there are instructions on the download page for the latest version.
About Signatures
In recent years people have more confidence in the Internet downloaded software. Bitcoin is investing into a new software which will be protective and keep different malware away. You need to examine every single thing in the Electrum’s code, to be sure not to download malware. In order to avoid this confirm your package’s signature and have confidence in Electrum’s number one developer Thomas Voegtlin, who has been constructing Electrum since 2011.
The page contains 2 links, one is software package and the other is signature file. By using a certain software signature file can be used to confirm your downloaded software. Wallets containing larger amounts of money should take this step. There are many articles describing how to confirm Electrum download on Linux, Mac and Windows.
Setup
Electrum takes data from a wizard during the initial steps of installation, more on this process search at the security, backups and addresses part of this guide.
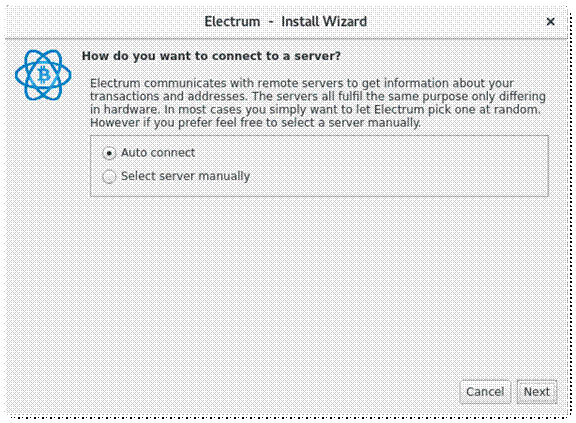
Clicking on the Electrum launch icon opens an Install Wizard asking you, how do you want to connect to a server. Select auto connect and click next.
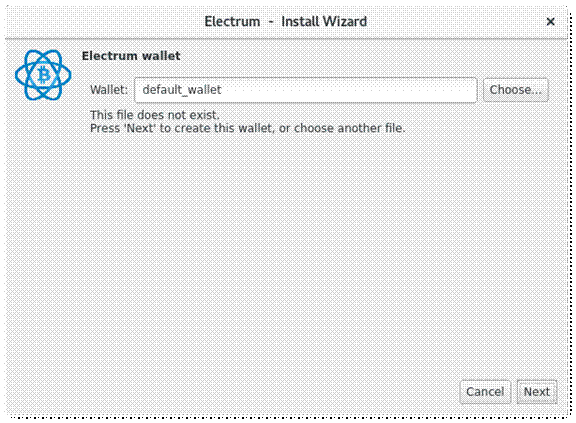
The next window asks you to name your wallet file, with the sentence ‘This file does not exist’. Install wizard suggests you default name default_wallet, just accept it and go next.
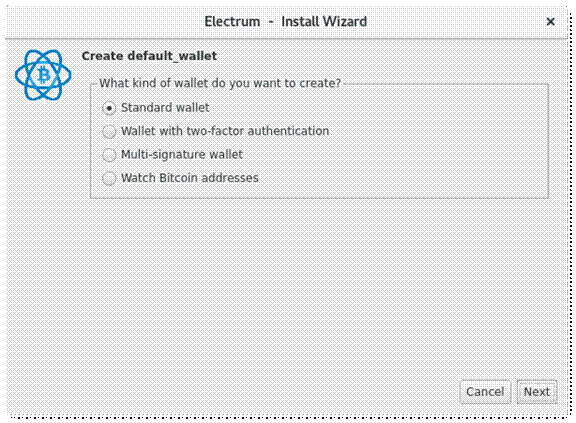
After selecting this ,third window pops up and offers you 4 types of wallets, with already selected option ‘Standard wallet’. Keep this option and click next.
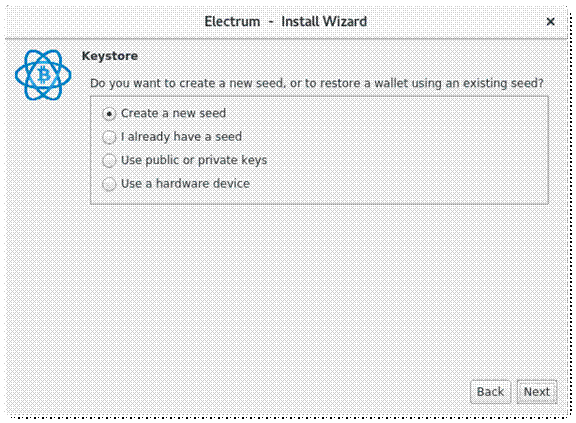
The next window is asking you about the type of keystore (set of signing keys used in making Bitcoin transfers, run by a seed). Use the default option ‘Create new seed’ which is already selected and click next.
The upcoming window shows your seed, take a piece of paper and write your seed carefully, don’t save it electronically, on your PC or print it.

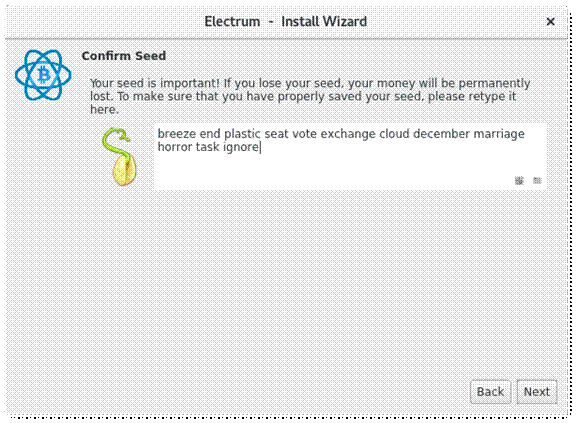
The following window requires to input your seed. Click in the text area and type the words of your seed. After you typed your seed the next button becomes active click on it.
In order to protect your seed as well as the entire wallet file you can encrypt the copy of your seed or the whole wallet file by picking the ‘Encrypt wallet file’. Selecting this file you encrypt everything in the wallet file not only the seed. This secures and protects your privacy info and your money from various attacks.
Learning and experimentation wallets do not have particular advantages from encryption, s leave the password fields empty and click next.

Electrum’s main screen will pop up. The circle in the right bottom corner should be green which means you are ready to use Electrum, but if it’s not green, you need to adjust your network settings. To adjust network settings click on the circle.
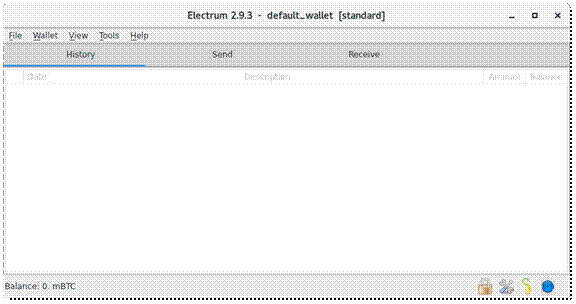
Funding your wallet
Now your Bitcoin funds can be transferred to your Electrum wallet. Be careful while transferring funds, because of possible mistakes in using Electrum and especially, if you are a new Bitcoin user. It is advised to take small transfers and amounts better than risking your total savings. Trying out real Bitcoin became very expensive because of a high transaction fees, which go up to a 1$ and more.
To learn Electrum process you have to make several transfers, but if your budget is small, this starts to be very expensive. Do not worry, there is a solution and it is called Testnet. It is a Bitcoin’s ‘twin brother’ who is working on a different network and using a different blockhain. Testnet is made for experimentation purposes, especially for the beginners and other as well. It gives the opportunity to the beginners to try the Bitcoin trading without any loss and risk.
Testnet is created with the purpose of no monetary value and you can them for free from faucets. To find them search the phrase ‘bitcoin testnet faucet’. One of the known and dependable faucets can be found at Bitcoin TestNet Sandbox. Electrum works in a similar way just like Testnet, in order to run it put Electrum in a Testnet mode.
Testnet mode
Electrum has a Testnet mode and using Testnet mode is quite easy, some features are different depending on the operating system. You need to make an operating system-specific launcher and put it in your desktop. Before you run Testnet Electrum launcher it is important to run it in Mainnet mode clicking on built-in launcher or your system launcher and Testnet Electrum will take the required files in order to run properly. Clicking on the launcher you can run the Testnet Electrum.
Testnet on Windows
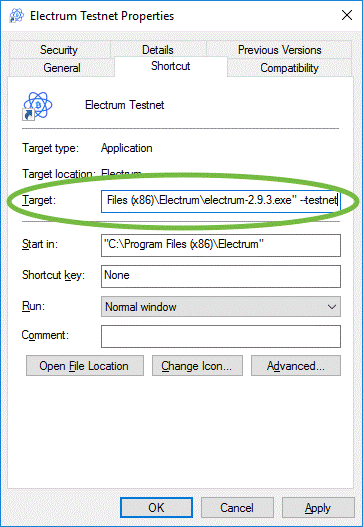
To set Testnet Electrum on windows, you need to copy your Electrum launcher on your desktop (right click- copy) and paste the new copy on your desktop (right click-paste) and rename the copy as ’Electrum Testnet’. Now right click on the icon and choose properties and in the ‘target’ field type ‘–testnet’ (press space button and type 2 dashes), then click OK.
Testnet on Mac
Create launcher through the Terminal application which is used to insert low level commands Run it by pressing command key (⌘) and spacebar at the same time, and then type ‘terminal’.
You need to type only two commands first: nano ~/Desktop/electrum after this text editor called ‘Nano’ will be active, then type the text bellow.
#!/bin/bash
open -n /Applications/Electrum.app –args –testnet
After you finish you will see the following Nano window:
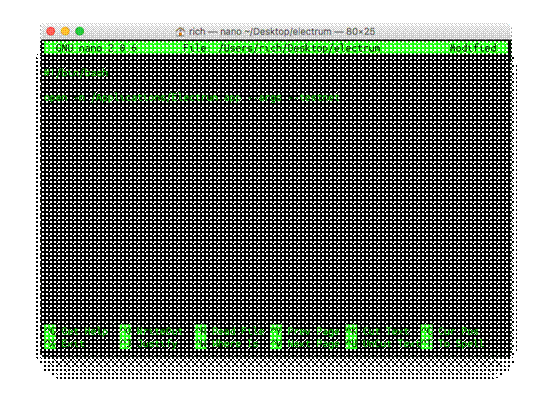
Press control-x and save the file, Nano will ask you to save the buffer then press capital Y and the return key. A new file electrum will be created on your desktop and also needs to be executable, to do this type chmod +x ~/Desktop/electrum in the terminal after this step icon appears on your desktop.

To start Electrum in Testnet mode double click this icon.
Testnet on Ubuntu
Open the terminal application, click the Ubuntu icon in which is in the upper left corner of your desktop and type ‘terminal’ after this type nano ~/Desktop/electrum.desktop which will open Nano editor. In Nano editor input the next text.
[Desktop Entry]
Type=Application
Name=Electrum Testnet
Exec=electrum –testnet
Icon=electrum
Press control-x, uppercase Y and then press enter and save the file. An icon ‘Electrun Testnet’ will appear on your screen. To make the launcher executable type this command at terminal prompt chmod +x ~/Desktop/electrum.desktop. The following icon will appear on your desktop.

Just double click on it and it will start Electrum in Testnet mode.
Verify Testnet Connection
It is crucial to confirm running the Testnet, this can be done by exploring the Receive tab. If you running Testnet mode, incoming address will begin with ‘m’ or ‘n’ and in other cases it will begin with ‘1’.
Testnet Servers
There are few Electrum Testnet servers, so in the process of launching Electrum in the Testnet mode you can face some difficulties while connecting. Red circle in your main window corner is your pointer, it means you can connect to a server. Look at the following list of servers Testnet servers.

Click the red
Double click on the red circle and open the Network configuration panel and untick the box saying ‘Select server automatically’, now click on the Server tab and insert the first two boxes with the host name and port of the server you want to connect to. Make sure that server’s protocol corresponds to the Electrum’s protocol (SSL or not, available from the Proxy tab) and close the window.
Receive a payment
An address is compulsory while receiving a payment. To get the address you can click on the Receive tab, copy the receiving address on the clipboard and insert it in your withdrawal service or just scan the QR code.

In this case we are accepting payment from a Testnet faucet. Insert your receiving address into a box ‘Your Testnet Address’. Tick ‘I’m not a robot’ box and then click on the ‘Give me some coins’ button.

Monitor transactions
Transactions can be found in the History tab, first transactions are labeled as ‘unconfirmed’, which means that it is still not attached to the block chain. Transaction that is already attached to the block has a confirmation, but one attached to the previous block has two confirmations and etc.

It is advisable to rename the transaction in order to find it later. Do this by double-clicking the Description box and insert a new name.

Right-clicking on the ‘Unconfirmed’ box opens information and details about the transaction. You can use blockchair.com or yogh.io to insert the transaction identifier.

While collecting the confirmations, transaction icon changes, a checkmark will appear after 6 confirmations.

Certain currency exchanges delay transferring the funds instantly, they accumulate them in order to save on paying fees. Delay lasts a couple of minutes. Localbitcoins and Coinbase work this way.
Make a payment
If you need to make a payment, open the Send tab and in the ‘Pay to’ box there’s a Bitcoin address of the person you pay to. Insert the address manually or from the clipboard. To easily identify the payment later, type some description.
The sent sum and the transaction fee make the total amount of the transaction. If your transaction is larger than your wallet balance, Electrum will warn you with red digits in your amount box, i.e. your funds cannot cover the transaction payment and the fees. As shown in the following picture.

In order to make a transaction fee must be included. Bitcoin fees are quite complicated to discuss. Bitcoin fees are taken according to the number of bytes required to encrypt a transaction while banking system charges fees according to the sent amount of funds.
Transaction length, measured in bytes and the market fee density create fees. The network transaction capacity influence the fee density. To inform yourself about the current fee density visit estimatefee.com.
You can set the fee density at the desired amount by moving the slider. If you set a higher fee density, total fee will be higher as well and the chances are bigger, that your transaction will be added to the next block. Transactions with small density fees are likely to be delayed, for a couple of hours, even days or not to be processed at all. To avoid this problems tick the ‘replaceable’ box, which means that transaction can be sent again despite of fee density delay.
Some of the services will not receive unconfirmed replaceable transaction, they will ask for confirmed one, but anyhow the replaceable box should be ticked. Electrum’s slider can charge fees depending on the network traffic which means that you can underpay or overpay fees. To set fees to custom open the Tools menu and click Preferences, then click on the Fees tab and tick the box ‘Edit fees manually’ then close the window.
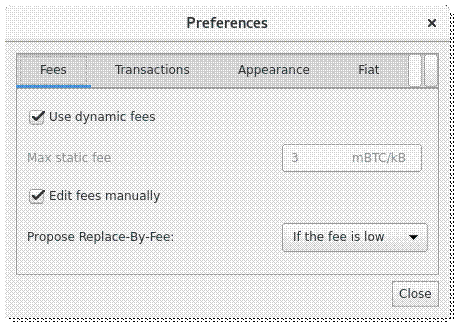
Now you can insert wanted fee amount for your transaction in the right box of the window, be careful this is not a fee density it’s the total fee and you have to know the transaction’s amount in bytes if you want to determine it.
You can adjust fees using a slider for rough adjustment and use the fine tune with the input box. On the following window is the 1 testnet mTBC (0.001 tBTC) returned to the faucet with medium fee density.
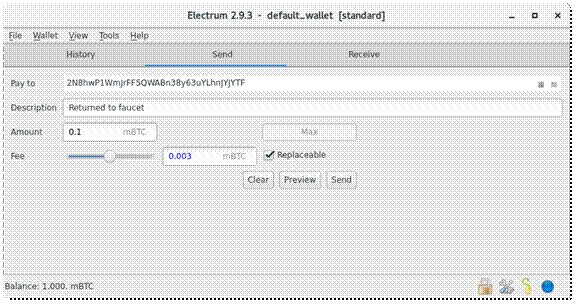
It is recommended to check your payment before the transfer. Click on the preview button and see all the important information about the transaction :sent amount, transaction length in bytes, the fee and density fee, address :source and destination.
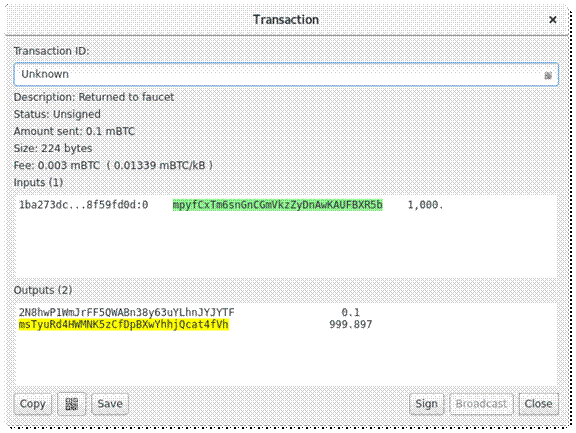
Bitcoin is presented as electronic cash system and it shows digital crypto as output transactions. In the Output box we can see 2 transactions despite that only one is paid, that happens because the first output is paying for the inserted address in the payment form and the second for one of your own addresses. There’s some change left from the transaction, in this example (0.999897 tBTC).
There is also an option to sign and broadcast transaction, click sign then broadcast, but if you have a password Electrum will demand it. Send transaction by clicking the send button from the same tab.

After this task (signing and broadcasting ) you can observe you payment. As we see a replaceable transaction gets a yellow triangle until it is confirmed.
Sweep a Paper Wallet
It is known that you can get a paper wallet from other users. After receiving a paper wallet your task is to import its private key in order to sweep the funds. This kind of Bitcoin keys start with number ‘5’ or letters ‘K’ or ‘L’ containing a number of various characters, as in the picture below.

You can choose to sweep or transfer your funds to your Electrum wallet, to do this go to‘Private keys’ in the Wallet menu.

In the table ‘Enter private keys’ insert one or more of your keys. Pay attention to lines, one key one line. Address at the end of a window presents the target of the funds that are swept. Changing an address is also possible by clicking on its button and of course Electrum wants that swept funds have confirmations.
Seeds and Change Address
Deterministic key pool is under Electrum’s control, which produces a number of key pairs (public or private), from a single master key, which can be presented as a seed (number of words used when making your wallet) and it does a comlplex tasks to solve the certain problem.
Take a look at the Address tab, go to show addresses in the view menu.

You will be confused to see that all of the received addresses are empty and the wallet balance is zero. Where is the money? Keep scrolling the address tab till you come to a change list, open the list (click on the triangle). You will see some non-zero balances with change addresses if you did some transactions recently.

We know that Bitcoin is an electronic system and it has a lot of in common with paper banknotes system. When using cash money you can pay exact sum or you overpay and expect to get rest as the change. Believe or not Bitcoin works in similar way, you think that your wallet is reduced during a certain transaction.
This is what happens, a certain coin is taken from your account, so its face value is not the same as the value you have to pay. Transaction makes two new coins, one pays the other side of the transaction and the other comes as a change to you. Therefore this change goes in the change address.
Find more information here Bitcoin: Think of it as Electronic Cash.
For example if we spend total of 1 tBTC ,a (0.0001 tBTC) would be sent to the faucet-the payee address and the another part goes to a new address that is made (0.999897 tBTC),so the amount of (0.000003 tBTC) is the transaction fee taken by the network. You can disable this in the Electrum, but thi is not a good idea, first read Who Needs Bitcoin Change Addresses Anyway? There’s an option to change addresses in the Preferences window and use other transaction settings. Open preferences in the Tools menu.

Electrum’s seed platform enables you to change all wallets addresses and personal keys. The wallets which are using same seed will be synchronized. This type of platform secures Bitcoin and is known as cold storage and is far more safe then this one shown here. Find a lot of useful information about cold storage in the book Owning Bitcoin.
Make a Backup
An Electrum seed is in control of all the addresses and the personal keys and saves paper copies of your wallet seed. Find your wallet’s seed in the wallet menu and enter a strong password you have made when opening Electrum wallet.

It is advisable to rewrite the twelve words seen in the box and put them in a safe place, if someone comes to your seed words can take everything you own in your wallet. You can also backup your wallet choosing ‘Save copy’ in the ‘File menu’ and secure your seed.
Testing Backup: Delete Your Wallet
In order to backup your funds from Electrum wallet, you must provide seed which is crucial in the process of recovery.
Beware that this task will delete all your data in your wallet. This procedure gives you an opportunity to restore your wallet and keep your money in the case of great system failure, if you face difficulties and not manage to recover your wallet, you lose everything.
First, confirm that your wallet has a small amount of Bitcoin, that you can accept to be lost and confirm that you have your seed secured (written on paper), then go further. Therefore to make a new wallet the old one has to be deleted. First exit the Electrum and find the Ellectrum’s data directory.
Delete Wallet on Windows
- Show hidden files.
- Browse to \Users\YourUserName\AppData\Roaming\Local\Electrum.
- delete everything in the directory.
Delete Wallet on Mac and Linux
- Open the Terminal;
- Type “rm -rf ~/.electrum/“.
If you are using Electrum Testnet re-make the Electrum data directory to exclude possible errors.
If you are a Windows user, create a folder named testnet in the Electrum folder.
Mac and Linux users, input the Terminal command mkdir -p ~/.electrum/testnet.
Testing Backup: Restore Your Wallet
After finishing the above tasks and deleting the data directory, you need to restart Electrum. Install wizard will show up and open a Keystore window offering you options. Select ‘I already have a seed’ option and go next.

Insert your twelve seed words in the provided box and click next. If you enter the seed accurately, you will need to create a password for your wallet.
After this few steps Electrum will connect to the server and synchronize your past transactions addressing them as ‘unverified’ in the start, until the synchronization process is finished. You can observe this task viewing the network window. Electrum will display your confirmed transactions in the History tab.

Security
Security is an important joint in this digital chain as well as setting proper password. If you want to change the wallet’s password go to the Password option in the Wallet menu. You also change password by clicking on the lock icon in your main window. The next step is easy just insert and confirm new password.
Wrapup
We hope that this Electrum guide enhanced, improved and helped to all of you, especially to the newcomers and beginners. We tried to present you, in the easiest way, the most important features, tasks and steps in using Electrum (sending, receiving, backing up, restoring, etc.). If you want, to broaden your knowledge and become an advanced Electrum user go through the Owning Bitcoin e-book.
If you are hardcore crypto-fanatic, you probably hold some of these coins as well. Here are the wallet solutions for them:
- Most secure bitcoin wallets
- Best Ethereum wallets
- Best Dashcoin wallets
- Best wallet for LTC
- Best wallets for NEO and GAS coins
- Bitcoin Cash wallets
- PIVX wallets.


